ARKit tutorial: Star Wars TIE fighter
A lot of interesting things were introduced at WWDC this year. Among them we find ARKit, the new framework that allows developers to create augmented reality mobile apps. This framework will, no doubt, open an entire world of possibilities for iOS developers and will speed up AR development.
Augmented Reality, what is it?
The idea of augmented reality is to blend the real world environment with digital objects. In other words, it creates the illusion of virtual objects placed in the real world. This gives the impression that these objects are actually real. Unlike virtual reality, which creates an artificial environment, augmented reality uses the existing environment and adds virtual elements to it. In the following tutorial you will learn 1) how to make your first steps in AR app development and 2) how to create your first application using ARKit and SceneKit. By the end of this tutorial you will be able to place one or more 3D objects and play/stop animations on them. Click here to watch the demo
Requirements: In order to create an AR app, you need to have the following:
- iPhone : SE, 6s/6s Plus, 7, 7 Plus or iPad : 12.9", 10.5" or 9.7”
- Xcode 9
- iOS 11
To download Xcode 9 and iOS 11: click here. You can find and download the code of this project here.
Step 1: Create a new Xcode project. Open Xcode and choose Create new project. Apple now provides a new template for augmented reality apps. Choose this template as shown below:

Next, choose one of the Content technology choices. There are three options available: SceneKit, SpritKit andMetal. ARKit also supports Unity and Unreal Engine , so you can work with one of them as well.

Step 2: Import the 3D model to Xcode Now we have initiliazed our project. If you open art.scnassets, you will notice that there is a 3D ship placed by default. We are going to replace this model with another one we downloaded. You can download free 3D models from www.turbosquid.com SceneKit also supports .dae format, so if your 3D model is in another format, you can convert it to .dae using blender or any other similar program. Add the 3D model that you have just downloaded to the art.scnassets as shown below or just by dragging and dropping it to the file.

Let's start coding now...
Step 3: Create a Virtual Object class: First of all, let's create a separate class for the virtual object. Because we’re using SceneKit, our object model should be a subclass of SCNNode. Let’s now focus on the loadModel() method shown above: First of all, we create the 3D object using the guard let statement to guarantee that if ever it doesn’t work, we simply return. After that, we create a wrapperNodefor our virtual object: Then we add every child node of the virtual object to the wrapperNode: Last thing, we add the wrapperNode as a child to the virtual object. In the app you will be able to remove the 3D object, for this reason we need to implement the following method in order to remove the object from the scene. Add the following method in the VitualObject class:
Step 4: Setup the scene. Now open ViewController.swift. In order to understand how ARKit and SceneKitwork, delete the code in both viewDidLoad() and viewWillAppear(_ animated: Bool) methods and let’s do it by ourselves. First of all, in the viewDidLoad() method add the following code to prevent the screen from being dimmed. Now let’s setup our sceneView by implementing the following method: Call this method in viewDidLoad()
Step 5: ARConfiguration One of the most important steps is configuring the world tracking configuration 'ARWorldTrackingSessionConfiguration' to make sure that the device supports it. If not we set the 'ARSessionConfiguration'.
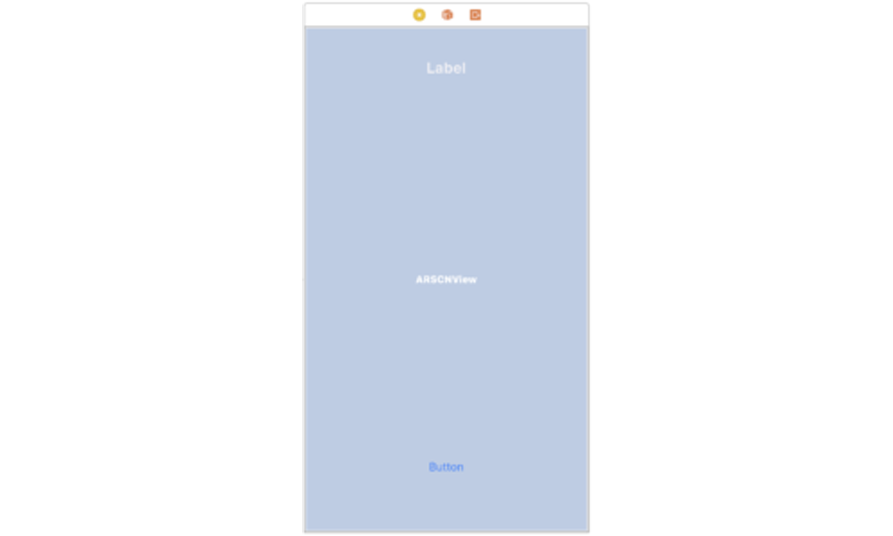
Step 6: Add button to place the object Now the scene is set up, let’s create and add our virtual object: Open Main.storyboard, you will notice that an ARSCNView is already placed. This is because we have chosen SceneKit when we created the project. We are going now to add a 'button' and a 'label' on the screen. But before adding any of them, it's necessary to add UIView, and then the ARSCNView other wise you will not be able to add any UIComponent. Drag and drop the Button on the bottom of the screen and a Label on the top (we will see later why we need the label)
Add the action to the created button as shown below. We first check if the object is already placed in the scene and if not, we can then add it. In the addObject() method, we first create an object and give its name in the parameters. Then we call the loadModel()method. After that we need to position our object somewhere in the scene. I chose to position the virtual object in the camera’s coordinates but feel free to change the position if you want it to be in a specific place. Now, we will create a class called CameraConfig. In it we will make the necessary configurations for the camera and the scene. Now go back to the ViewController.swift and call this method in setupScene(): Then add the following code in the addObject() method to position the 3D object: Now, if you test the application, you may notice that the object might be very large (depending on its original size). To adjust the size, open art.scnassets and select the 3D model. Select the Node inspector on the right side and change the model’s scale to 0.01 for the x, y and z axes which is the same scale as the default ship model in the SceneKit.
Step 7: add animation The next step we are going to do, is adding some animation on the object such as rotating, moving around, hide the object, stop the animation altogether, etc. For this, we will implement touchesBegan and hitTesting in order to detect the user's tap on the screen. If the user taps once on the 3D model for the first time, we start the animation. A second tap on the 3D model, will stop the animation. HitTesting is one of the main concepts of ARKit. It searches for anchor points in the scene or in the real world detected objects, then performs a list of results describing the content found. Once we have the result, we can then apply the animation on the same location as these anchor points returned by the hitTest. A 3D object might have several nodes, for this reason, we can always check the node's name if we want to add the animation on a specific node or on the whole 3D object (depends on what you want).
Step 8: Implement animation By tapping on our 3D object it will rotate and move. This action will keep repeating… We will implement this animation using the SCNAction class and we will have two different methods: The first one startAnimation(node: SCNNode) which will create the rotation: Then we have the second method moveOn(node: SCNNode) which will make our object move on along and then come back. This animation of both methods will keep repeating forever as mentioned above. Let’s now see how to stop the animation: Stopping the animation is pretty simpel. You simply remove all the action from the responsible node. So far if you test the application you will be able to add the 3D model and by taping on it once the animation will start, while tapping a second time will stop it.
Step 9: Light configuration No doubt that the lights are one of the main things that make a virtual content looks more real and reach a high level of realism. So we are going now to setup the lights for the scene and for the virtual object as well to match them with those of the space we are interacting with. Let’s start by the scene’s light: First of all, we need to setup the lights intensity manually. To achieve this, we disable the property automaticallyUpdatesLighting that automatically creates and updates the lights of the scene. Add the following line of code in the setupScene(). We will also disable the property autoenablesDefaultLighting of the sceneView. So add this line of code in the setupScene(). The reason behind this, is because SCNView adds light to the scene by default. It locates it from the camera’s position and points on the object model. This sounds good, but once we start changing the lights and the intensity we will have a couple of problems with that. We are going to use another property from ARSessionConfiguration which is the lightEstimationEnabled. This property allows us to get the value of lightEstimate that estimates the lighting conditions based on the camera image. If the lightEstimate is nil, this means that the lightEstimationEnabled is disabled. By implementing the following method in the ARSCNViewDelegate protocol we can adjust the light intensity if the lightEstimationEnabled is enabled, however, we set the default value.
Step 10: Remove the object When we have created our class VirtualObject we had implemented a method called unloadModel(). It will remove the object from the scene when the user taps on it with two fingers. In the else { } of the override func touchesBegan(_ touches: Set<UITouch>, with event: UIEvent?) add the following code: Similar to what we did to play the animation, we will also use hitTest in order to know the position where the user tapped. And because our object has multiple children, the hitTest result can be on a specific child and not the whole object. For that, if the tapped position is a part of our tieFighter, we will remove the node's parent and the remaining will be the whole object.
Step 11: Session configuration ARSessionDelegate allows us to track state from an ARSession, so we are going to implement this protocol in order to follow the changes of the session and the sets of the tracked anchor objects. In the following method we will simply display a message when the session is failed in order to let the user know what happened: If the session is interrupted, the sessionWasInterrupted method will also display a message for the user and remove the 3D object so the user can replace a new one. When we have setup our Main.Storyboard, we have added a UILabel on the top of the screen, it's time to use it. The following method cameraDidChangeTrackingState will allow us to track the camera track state and keep informing the user with the tracking state. And the ARCameraTrackingState extension:
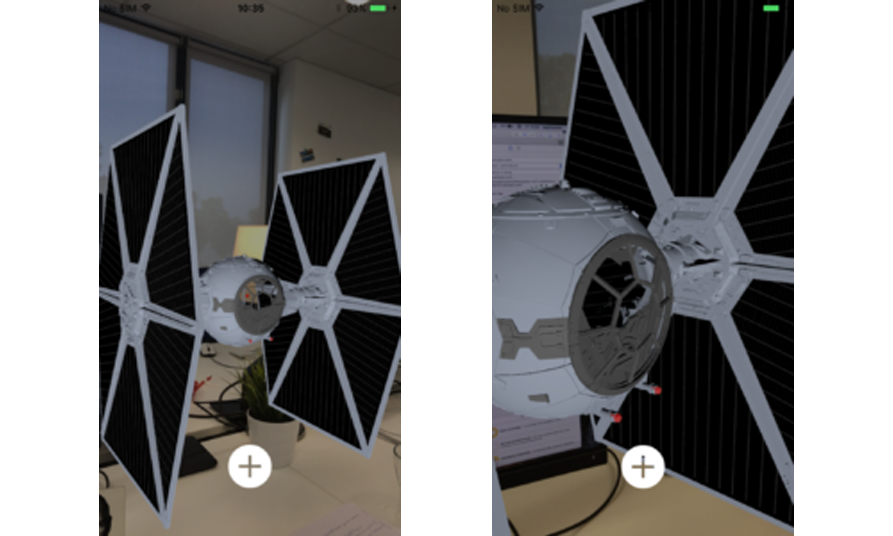
Step 12: place another object The last step is placing another 3D object in our scene. This time the object will not be placed in the camera coordinates but where the user taps. So I think you guessed what we will use.... Yes, HitTest again :)) The following method placeNewObject(touch: UITouch) will place the new object where the user tapped and guess what? We are not going to create a new VirtualObject. Instead we can copy another one using the Clone() method that creates a copy of a specific node and its children. Now in the toucheBegan delegate, add a new else {} block and add this piece of code: Now run your application and start placing one object then add others, play and stop the animation and fill your space with tieFighters...
Conclusion:
You have reached the end of this tutorial, I hope you enjoyed it and learned a couple of things. From here on you can start your ARKit app and imagine lots of things to do with this framework!