How we do iOS apps: Part 3 - Debug Drawer
This is the third post in a series where we describe how be build iOS apps at AppFoundry.
In this part we’ll explain how we add debug settings screens to our applications.
What is a debug drawer
The concept of a debug drawer is really simple:
While under development, we want to have a debugging screen for manipulating different settings in our app on the fly.
For instance:
- you want to bypass the login flow of your app while developing some feature, but you want to be able to reactivate that flow on the fly to see how the login flow integrates with that feature
- you want to access different backend environments during development
- you want to provide some build information to your testers
Of course, we’ll need a technique to exclude this debug drawer once we release the app.
To help you understand where we’re going with all this, we’ve created a companion app for this blogpost, which you can find on our GitHub page.
Form and flavour
If it comes to adding a debug drawer to your app, you have many options. For instance:
- you can add a navigation drawer / sliding menu that slides in
- you can add a modal view controller that pops up when you hit a button on your app’s navigation bar
The problem with these solutions is that they are very specific to how your app navigates. We wanted a solution that will always work, no matter what the layout and the used components of the app itself are.
Here’s the idea: create an extra window for the application, make sure it renders above the regular application window (and other system windows that might pop up, such as alert views, …), make it small and draggable so that it never sits in the way of the actual app.
About the companion app
The app we’ve created as a companion to this post wants to showcase two things:
- how a debug screen can manipulate the outcome of certain functionalities in your app
- how a debug screen can show general info about the app, such as the version, the app identifier, etc.
What this app does is show a message, generated from a StringService. The app has two implementations of this StringService. Which implementation of the StringService is used depends on whether we are running the app in Debug or Release configuration. If the production service is used, the message will just be “Hello World”. The debug implementation will first check if it needs to use the production service, or if it needs to return a customized message. The customized message itself is taken from the debug drawer.
Go ahead and run the project in Xcode!
The project uses CocoaPods, so remember you’ll need to run pod install and open the workspace instead of the project.
The debug window
Presenting the debug window to the user is really simple. This is the Swift code from the companion app, where the window is created and shown to the user:
// Get the frame of our screen
let frame = UIScreen.mainScreen().bounds

// Create a new debug window, and position it at the top right of our screen
// (make sure to keep a reference to the window, it will be removed from memory otherwise!)
self.debugWindow = WindowForDebug(frame: CGRect(x: CGRectGetWidth(frame) - 75.0, y: 0, width: 75, height: 75))

// Make the window appear
self.debugWindow.hidden = false
The next code snippet is taken from the WindowForDebug class, which is a sub-class of UIWindow
override init(frame: CGRect) {
 super.init(frame: frame)

 // Make the window transparent, so that it doesn't hide the actual applications content
 self.backgroundColor = UIColor.clearColor()

 // Make sure the 'z-position' of the window is above the application window and all other windows that might popup
 self.windowLevel = UIWindowLevelStatusBar + 100.0

 // Add a pan gesture recognizer, so we can move the debug window around
 let pan = UIPanGestureRecognizer(target: self, action: Selector("panned:"))
 self.addGestureRecognizer(pan)
}

func panned(recognizer:UIPanGestureRecognizer) {
 let translation = recognizer.translationInView(self)
 if let view = recognizer.view {
 view.center = CGPoint(x: view.center.x + translation.x, y: view.center.y + translation.y)
 }
 recognizer.setTranslation(CGPoint(), inView: self)
}
The gist of what we do here is we make sure that the window is on top of everything else and that we can drag the window around using a pan gesture recognizer.
The debug window view controller
The task of the WindowForDebug’s rootViewController is to make a modal panel appear when its button is tapped. Since the debug window itself is really small, we have to present this panel in the app’s main window stack.
To do this, we’ll take the following steps:
- fetch the currently presented (visible) view controller of the application’s main window
- present a model ‘form’ view controller on it
- hide the debug window, since the debug screen is now open anyway.
In code:
func buttonTapped(button:UIButton) {
 // Hide the debug window
 self.view.window?.hidden = true

 // Present the form controller on the 'top' presented view controller of the app
 let controller = FormViewController()
 // ...
 let nc = UINavigationController(rootViewController: controller)
 self.topPresentedViewController()?.presentViewController(nc, animated: true) {}
}
For brevity, we omitted the setup of the actual form that will be shown.
Switching between services
As said, at runtime, we want to be able to switch between production code and debug code.
To keep the code clean, we’ll introduce a protocol that gives us a contract for generating a message. This protocol will then be used in the view controller. In this way we decouple the StringService implementation from the view controller.
This is what the protocol looks like:
protocol StringService {
 func greeting() -> String
}
The production implementation looks like this:
struct ProductionStringService : StringService {
 func greeting() -> String {
 return "Hello World"
 }
}
To enable the debug code to switch to production, we’ve injected a reference of the production service.
Here is the implementation:
class StringServiceForDebug : StringService {
 private let productionStringService:StringService

 init(productionStringService:StringService) {
 self.productionStringService = productionStringService
 }

 func greeting() -> String {
 if (NSUserDefaults.standardUserDefaults().useDefault) {
 return productionStringService.greeting()
 } else {
 return NSUserDefaults.standardUserDefaults().customDebugMessage
 }
 }
}
The idea is that the useDefault setting decides whether the productionStringService is used to return a message or not. If useDefault is true the call to the greeting() method will be forwarded to the productionStringService. If it is false, the customDebugMessage will be returned instead.
We use an extension on NSUserDefaults to fetch and save a user default, check out the git repository if you want to see the actual code.
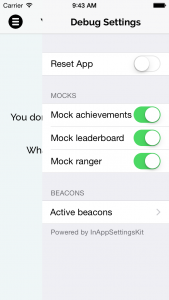
The debug drawer form
In this example we’ve used Eureka. It’s an amazing framework that helps you create forms in a table view with ease. The form contains 2 sections:
- The first section takes the values from the calculated properties we’ve added to a NSUserDefaults extension
- The second section takes some values from the `NSBundle.mainBundle().infoDictionary’
Here is how it looks:

The view controller
The view controller needs to use our string services to show a message to the user when she or he taps the ‘generate greeting’ button.
To get a hold on the service, we’ll use the service locator pattern.
The AppDelegate will instantiate such a service locator and expose it as a property. We can then access the serviceLocator property from within the rest of our application.
Remember that we decoupled the actual service implementation of the StringService from the view controller. The controller doesn’t care about which version is used.
Switching between locators
We’ll create two different service locators: one for production, one for debug. The production service locator will return an instance of the ProductionStringService. The debug version of the locator will return an instance of the StringServiceForDebug. As the debug window is only needed when the StringServiceForDebug is used, we’ll use it to instantiate the WindowForDebug as well.
We need to make sure the debug drawer code isn’t included when we release the app. We can do this with the EXCLUDED_SOURCE_FILE_NAMES User-Defined Build Setting.
To make this work, we’ll include ForDebug in all files names that we don’t want in the release build, and then set the value for the EXCLUDED_SOURCE_FILE_NAMES setting to *ForDebug* for the Release configuration.

Last but not least, we have to make sure the ForDebug code isn’t referenced when we build for release. We do this with a macro (one of the few macros that still exist in swift):
//In our AppDelegate
func application(application: UIApplication, didFinishLaunchingWithOptions launchOptions: [NSObject: AnyObject]?) -> Bool {
 let productionServiceLocator = ProductionServiceLocator()
 #if DEBUG
 serviceLocator = ServiceLocatorForDebug(productionServiceLocator: productionServiceLocator)
 #else
 serviceLocator = productionServiceLocator
 #endif
 return true
}
We want to avoid this macro as much as possible, so we’ll use our service locator as switch board. In this way we’ll only need this macro once, in the AppDelegate. In the ServiceLocatorForDebug we can safely assume that we can use other ForDebug types.
Conclusion
As you have seen, adding a debug drawer to your application takes minimal effort. At AppFoundry, we include one in all of our apps. It makes development easier and our testers love it too. Try it out, it’s fun!